
To create a plaster fireplace surround with boho curves, start by shaping your plaster while it’s wet, using your hands or tools to craft flowing, organic lines that mimic natural forms. Add textured finishes like troweled plaster or stucco for depth and tactile appeal. Use earthy tones and subtle color washes to enhance the relaxed, eclectic vibe. With careful craftsmanship, you’ll turn your fireplace into a handcrafted statement piece that embodies boho charm; learn more to perfect your design.
Key Takeaways
- Design flowing, organic curves using wet plaster to mimic natural, relaxed boho forms.
- Apply textured finishes like troweled plaster or stucco for depth and tactile interest.
- Use earthy, muted color palettes to enhance the boho aesthetic and create harmony.
- Incorporate gentle layering, washes, or patinas to add dimension and visual complexity.
- Combine craftsmanship with artistic techniques to craft a unique, handcrafted fireplace surround.
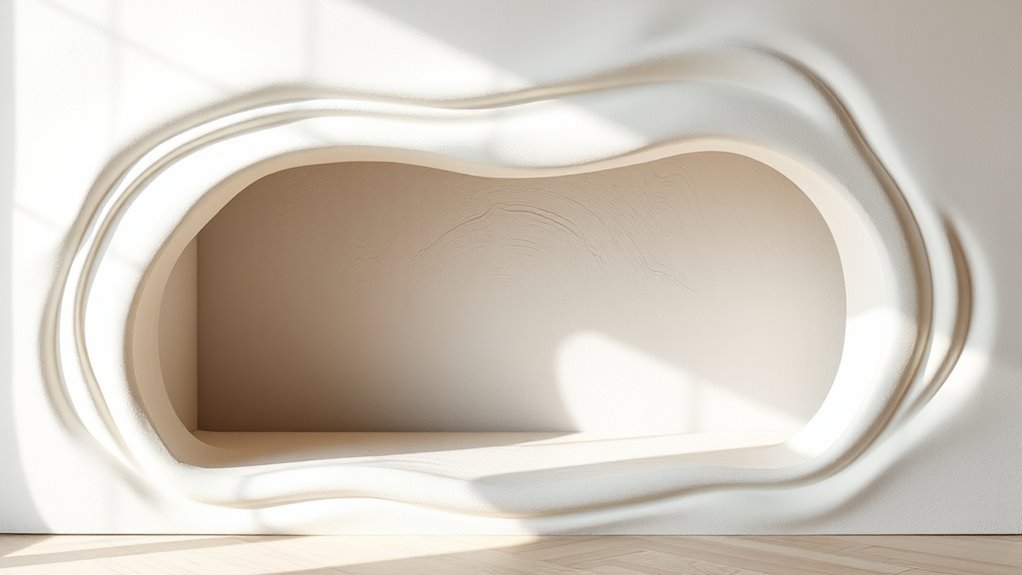
If you’re looking to add a unique focal point to your living space, creating a plaster fireplace surround with boho curves is a fantastic choice. This approach not only elevates the aesthetic appeal but also allows you to infuse personality and texture into your room. The key to achieving this look lies in selecting the right textured finishes and color palettes that complement the relaxed, eclectic vibe of boho design. Textured finishes, such as troweled plaster or stucco, bring depth and tactile interest to your fireplace surround, making it a true statement piece. These finishes can be manipulated to create subtle ripples or bold, layered textures, giving your fireplace a handcrafted, artistic feel. When working with textured finishes, keep in mind that the surface should be smooth enough to highlight the curves but rough enough to add visual interest. Incorporating expert techniques and understanding the versatility of different plaster textures can further enhance your design efforts.
Color palettes play a *vital* role in shaping the overall ambiance. Boho style typically favors earthy tones, muted pastels, and warm hues that evoke a sense of comfort and connection to nature. Think sandy beiges, terracotta oranges, soft blushes, or deep olive greens. You can choose to keep the plaster in a neutral tone and add color through accents like surrounding walls or decorative accessories, or opt for a tinted plaster to have the entire surround stand out as a bold feature. Whichever route you take, the goal is to create harmony and balance within your space.
Creating the boho curves involves shaping the plaster into flowing, organic lines that soften the traditional boxy fireplace structure. Instead of sharp angles, you’ll focus on gentle, sweeping curves that mimic natural forms. To achieve this, you can mold the plaster while it’s still wet, using your hands or tools to create undulating shapes. The curves should feel relaxed and freeform, embodying the effortless, laid-back spirit of boho style. Once the plaster dries, you can further enhance the textured finish with subtle color washes or patinas that deepen the visual interest and add a layer of warmth.
Ultimately, designing a plaster fireplace surround with boho curves is about blending craftsmanship with creativity. By selecting textured finishes and thoughtful color palettes, you set the stage for a stunning feature that elevates your entire living space. This combination of tactile detail, organic shapes, and vibrant or muted hues creates a cozy, inviting atmosphere, perfectly aligned with boho’s free-spirited ethos.
Frequently Asked Questions
Can This Plaster Technique Be Used on Outdoor Fireplaces?
You can use this plaster technique on outdoor fireplaces, but you need to focus on weather resistance. Apply weatherproofing techniques like sealing and sealing again to protect the plaster from moisture, temperature changes, and outdoor elements. Use a durable, outdoor-specific plaster mix, and consider adding a waterproof sealant after finishing. Proper weatherproofing guarantees your boho curved plaster surround remains beautiful and intact despite weather conditions.
What Safety Precautions Are Needed During Plaster Application?
You should wear safety gear like gloves, goggles, and a mask to protect yourself from dust and fumes during plaster application. Make certain proper ventilation in your workspace to avoid inhaling harmful particles and fumes. Keep the area well-ventilated by opening windows or using fans. Always follow manufacturer instructions, and take breaks to prevent inhaling excessive dust. These precautions keep you safe while achieving a beautiful plaster finish.
How Long Does the Drying Process Typically Take?
The drying process typically takes 24 to 48 hours, but environmental factors like humidity and temperature can extend this. For example, if you live in a humid climate, you might need up to 72 hours for complete drying. To guarantee proper curing, keep the area well-ventilated and avoid touching or applying pressure until the plaster is fully dry. Patience ensures a smooth, durable finish for your boho-curved fireplace surround.
Is Special Equipment Required for Achieving Boho Curves?
You don’t need special equipment to achieve boho curves; just basic tools like a flexible drywall knife, sponge, and shaping tools. However, mastering the curves can be tricky, so seeking expert assistance or guidance can help you get smooth, natural lines. Practice with your tools, and don’t rush—boho curves look best when crafted with patience and attention to detail.
Can I Customize the Color of the Plaster Finish?
Yes, you can customize the color of the plaster finish to match your style. You have a range of plaster color options, from earthy tones to vibrant hues, allowing you to personalize your fireplace surround. Customizing finish options means you can choose subtle shades or bold statements, ensuring your design reflects your taste. By mixing pigments into the plaster or applying tinted finishes, you craft a unique, cohesive look that complements your space perfectly.
Conclusion
Now that you’ve crafted your boho-curved plaster fireplace surround, imagine the stunning transformation it’ll bring to your space. But the real magic begins once you add those final touches—will you choose bold colors or subtle textures? The possibilities are endless, and the final result could be more breathtaking than you ever expected. Are you ready to reveal your masterpiece? Remember, sometimes the smallest details make the biggest impact—so don’t stop now; your perfect fireplace awaits.