TL;DR
Putting your rig in a closet can massively reduce noise and reflections. The key is proper placement, sealing leaks, and balancing absorption with ventilation. Done right, it’s a quick, renter-friendly way to get studio-quality sound at home.
Imagine turning a tiny closet into your personal vocal booth — no fancy studio needed. It might sound like a DIY nightmare, but with the right approach, your small space can produce professional, clear recordings. The secret isn’t just adding foam; it’s smart placement, sealing leaks, and managing heat and sound.
In this guide, you’ll learn how to make your closet work for you — from soundproofing basics to placement tricks, and even how to keep your rig cool without sacrificing silence. Ready to turn that cramped closet into a content creation powerhouse? Let’s go.
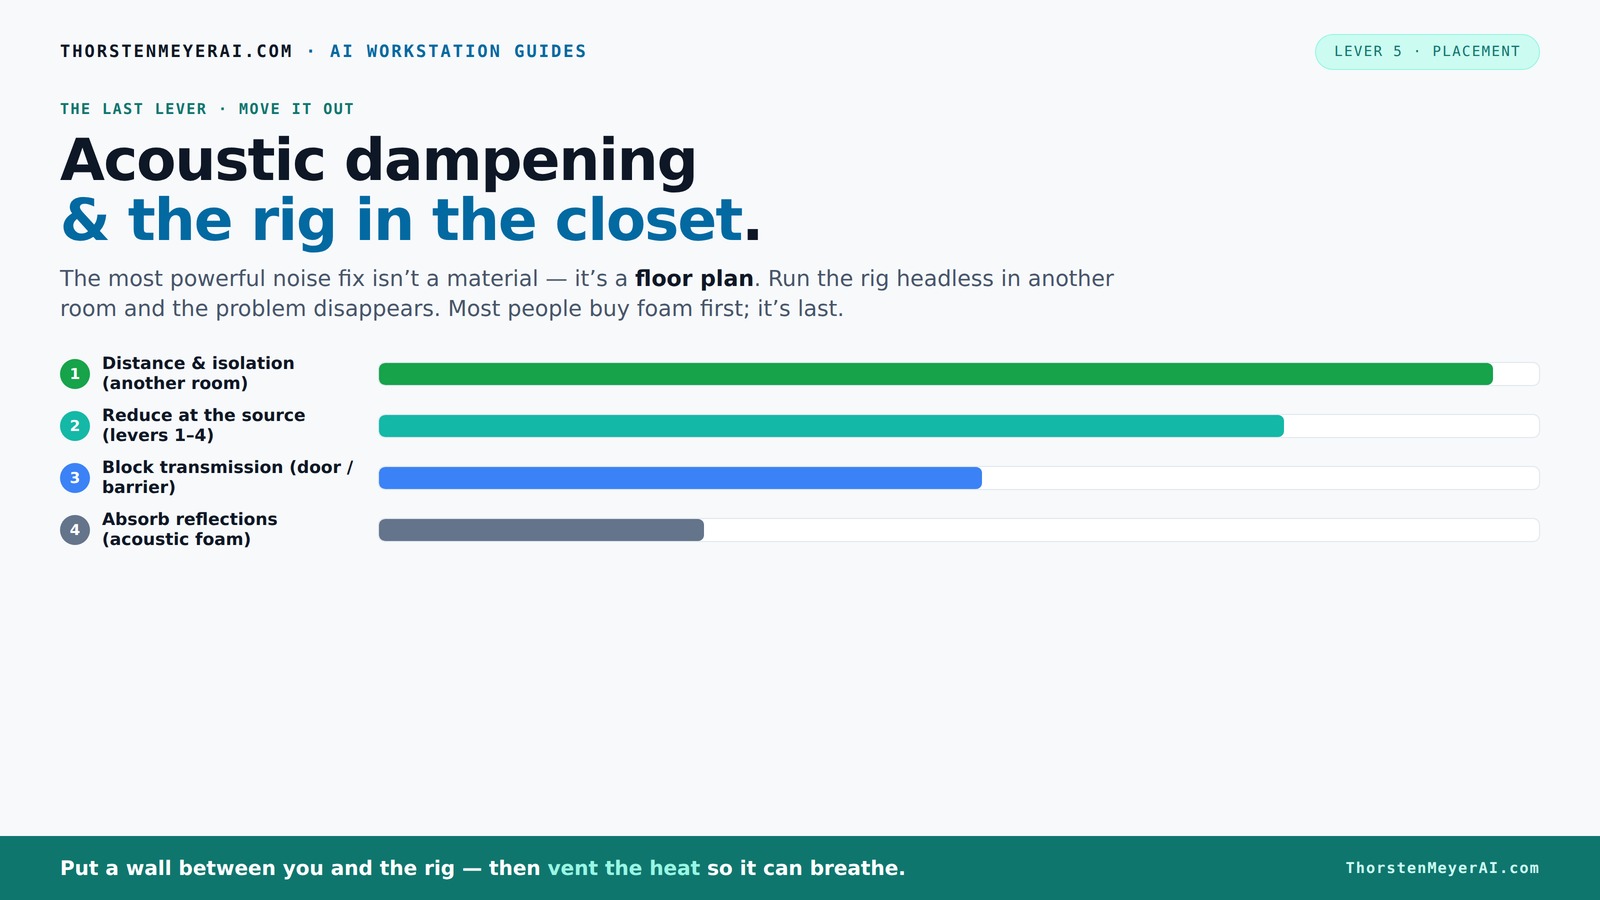
Acoustic dampening
& the rig in the closet.
The most powerful noise fix isn’t a material — it’s a floor plan. A rig you can’t hear because it’s in another room beats any amount of foam. Tap the approaches in Part 1 to see what actually works.
(another room)
(levers 1–4)
(door / barrier)
(acoustic foam)
Contain the noise, not the heat
Key Takeaways
- Sealing gaps and treating reflection points makes your closet recordings sound professional.
- Ventilation is critical — don’t trap heat or you’ll damage gear or get poor sound quality.
- Placement of acoustic panels at reflection points and in corners reduces echo and boomy vocals.
- A high-quality dynamic microphone and proper placement are essential for clear, focused recordings.
- A closet can be your best kept secret for quiet, intimate recordings — just plan carefully.

Focusound 52 Pack Acoustic Foam Panels 1" x 12" x 12" Sound Proof Foam Panles Soundproofing Noise Cancelling Wedge Panels for Home Office Recoding Studio with 300PCS Double-Side Adhesive
- Soundproofing Design: Triangular grooves for noise absorption
- Includes Adhesive Tape: 300pcs double-sided adhesive for easy installation
- Easy to Remove: Adhesive can be removed without wall damage
As an affiliate, we earn on qualifying purchases.
As an affiliate, we earn on qualifying purchases.
Why a Small Closet Can Be Your Best Recording Space
Small closets are like built-in vocal booths. They naturally reduce room reflections and echo, creating a tighter sound. Plus, they’re easy to seal and treat since you’re working with a confined space. Think of it like a cozy cave for your voice — warm, intimate, and surprisingly effective. You can learn more about acoustic treatment in small spaces.
For example, a YouTuber I know turned her closet into a podcast studio. She added some foam panels, sealed gaps, and used a reflection filter. Her voice now sounds rich and warm, with little echo or background noise — all without building a dedicated room.
Soundproofing vs. Acoustic Treatment: What’s the Difference?
Soundproofing and acoustic treatment serve different goals. Soundproofing blocks sound from leaking in or out — think of sealing gaps with weatherstripping or adding mass with drywall. Acoustic treatment, on the other hand, improves how sound behaves inside a space — reducing echo and controlling reflections with panels and diffusers.
Understanding this difference is crucial because many assume that simply adding foam will make a space soundproof, which isn’t true. Soundproofing requires mass and isolation to prevent sound from transmitting through walls or doors, which is often impractical in a closet. Acoustic treatment focuses on controlling reverberations and reflections, which directly affects the clarity and warmth of your recordings. The tradeoff is that while treatment enhances sound quality, it doesn't necessarily prevent sound from escaping, so combining both strategies—when possible—yields the best results. For more insights, check out this guide on acoustic dampening.
For a closet studio, sealing gaps and adding absorption are your go-to strategies. They keep the space quiet and improve sound quality.
Where to Place Acoustic Panels for Best Closet Sound
Placement of acoustic panels is crucial. Start by identifying the reflection points — these are spots where sound bounces directly into your microphone or ears. Use your mirror or a friend to find these points: behind you, the side walls, and the ceiling. For detailed techniques, see this article on acoustic panel placement.
Why does placement matter? Because reflections at these points cause comb filtering and echo, which muddles your recordings. Proper placement absorbs these reflections before they reach your mic, resulting in clearer, more professional sound. For instance, placing panels on the wall behind your mic reduces rear reflections, while side panels prevent lateral echoes. The ceiling often reflects sound downward, so ceiling treatment helps tame flutter echoes that can make vocals sound distant or muffled.
Don’t forget the corners — adding bass traps here can tame low-frequency buildup that causes boomy vocals. It’s about attacking the problem where it originates, which is especially important in small spaces where low frequencies tend to accumulate due to proximity.
How to Effectively Seal a Closet for Quiet Recordings
Sealing your closet is the first step to reducing noise leaks. Start with the door — hang a heavy blanket or add dense acoustic panels around it. Use weatherstripping to seal gaps around hinges and edges. You might also find this guide on sealing techniques helpful.
Why does sealing matter so much? Because even tiny gaps can let in external noise or cause internal sound to escape, undermining your efforts. Proper sealing ensures that your sound stays contained, making your recordings cleaner and reducing the need for post-processing. For example, a musician I know stuck a thick moving blanket over her closet door, then added weatherstripping around the frame. It cut down sound leakage significantly, making her recordings much cleaner. But remember, sealing isn’t just about blocking sound; it also helps maintain consistent acoustics inside the space, preventing sound from leaking out or unwanted noise from entering.
Next, seal small gaps around vents or wires with acoustic sealant or foam. Every leak you close makes your space quieter and more controlled. The tradeoff is that over-sealing can sometimes lead to poor ventilation, so balance is key.
Ventilation Tips for a Hot, Sealed Closet
Hot, enclosed spaces can turn your closet into a sauna — bad for gear and your comfort. The key is active ventilation. Use a quiet exhaust fan, ducted airflow, or a small vent with a vent fan that’s designed for soundproof environments. For more tips, see this article on ventilation in small spaces.
Why is ventilation so important? Because heat buildup can cause your equipment to overheat, which can lead to malfunctions or reduced lifespan. It also affects your comfort, making long recording sessions unpleasant. For example, one creator installed a low-noise inline fan with a duct running outside. The result? A cool, quiet space where the rig stays cool and the noise stays in. Proper ventilation prevents heat from accumulating, which not only preserves your gear but also ensures consistent sound quality. Remember, sealing a space without ventilation can create a dangerous environment for electronics, so always include a way for heat to escape while minimizing noise transfer.
Using the 'Rig in the Closet' Setup Effectively
Placing your rig in a closet is a smart way to contain noise, but it’s not just about hiding it away. Think about how you connect to it — use a wired network or strong Wi-Fi. Keep the cables tidy and away from reflective surfaces to avoid extra echo. For more on setting up your rig, visit this guide on rig placement.
Avoid stuffing the closet with unnecessary clutter; it creates more reflective surfaces. Instead, add soft materials like a rug or foam behind the rig for better sound absorption. This reduces internal reflections and prevents your setup from sounding hollow or overly reverberant. For example, a streamer I follow keeps his rack in a closet with some foam lining the walls and a vent fan. He reports that his voice recordings are now radio-ready, and the rig stays cool even during long sessions. The key is balancing containment with proper acoustic treatment and ventilation.
Choosing the Right Microphone and Placement in a Closet
The best microphone for a closet booth is one that minimizes room noise and captures your voice clearly. Dynamic mics like the Shure SM7B excel here because they reject background noise and handle reflective spaces well.
Place the mic about 6-12 inches from your mouth, slightly off-axis to reduce plosives. Use a reflection filter or a pop shield to block unwanted room reflections and sibilance.
Why does placement matter? Because the closer and more targeted your mic is, the less room sound it picks up. Proper placement reduces reflections, making your recordings sound more professional and focused. For example, a podcaster I know positions his mic just off-center, with a reflection filter around it, in a closet lined with foam. His vocals sound crisp, warm, and free of echo. The tradeoffs involve balancing proximity with comfort and avoiding overly close placement that can cause muffling or plosive buildup.
Common Mistakes That Ruin Closet Recordings
Don’t skip sealing gaps — leaks ruin your quiet space. Don’t rely solely on foam, which only controls reflections, not sound leaks or low frequencies. Avoid overcrowding the closet; it creates more reflections and reduces airflow.
Why are these mistakes harmful? Because unsealed gaps allow external noise to bleed in, and internal sound to escape, defeating the purpose of your treatment. Overcrowding with foam can create a labyrinth of reflective surfaces that muddle your sound rather than improve it. For example, one beginner filled his closet with foam panels and wondered why it still sounded hollow. The door was wide open, leaking sound out and in. Sealing gaps and proper placement made all the difference. Additionally, blocking ventilation can lead to heat buildup, damaging equipment or making long sessions uncomfortable. Balance is essential to maintain both sound isolation and a safe, functional environment.
Quick Tips to Maximize Closet Recording Quality
- Seal every crack and gap around the door and walls.
- Place acoustic panels at reflection points — behind, sides, and ceiling.
- Add a heavy blanket or foam to the door for better isolation.
- Use a reflection filter around the mic to tame room reflections.
- Ventilate with a quiet fan or ducted airflow to keep your gear cool.
Frequently Asked Questions
Is a closet actually good for recording vocals?
Yes, a closet can be great for vocals because it naturally reduces room reflections and echo. With some treatment and sealing, it creates a cozy, controlled environment for clear, warm recordings.Where should acoustic panels go in a closet?
Place panels at reflection points — behind your mic, on side walls at ear level, and on the ceiling. Corners benefit from bass traps to control low-frequency buildup.Do I need bass traps in a small closet studio?
In small closets, bass traps can help if you notice boomy or muddy vocals. Focus on the corners where low frequencies tend to concentrate, but don’t overdo it — treatment should be targeted.Can I soundproof a closet without construction?
Absolutely. Using heavy blankets, weatherstripping, acoustic panels, and sealing gaps can significantly reduce sound leaks without any permanent changes.How do I stop my closet recordings from sounding boxy?
Add absorption at reflection points, use a reflection filter, and avoid placing the mic directly against reflective surfaces. Proper placement and treatment make a big difference.Conclusion
Turning a tiny closet into a usable recording space isn’t magic — it’s about smart choices. Seal leaks, treat reflections, and keep your gear cool. When done right, your closet can rival a professional booth, without the hassle or cost.
Remember, the goal isn’t just silence — it’s clarity. A well-placed, well-treated closet turns noise into a smooth, studio-quality voice. So, what’s stopping you? Your perfect home vocal booth is just a few tweaks away.